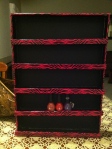
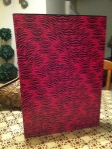
 If you are a nail polish addict you must have certainly seen the nail polish racks. Most of them range between $30 to $100 and you usually spend about $30 on shipping. Depending on your collection this can become and expensive hobby. Previously I had attempted to make one out of wood, that was not very successful since it ended up really heavy. I was worried I might damage the wall if I hung it. Therefore after some research I found a way to make a nail polish rack, that is easy, inexpensive and lightweight.
- Two pieces of foam board (Target: $3.44)
- Hot Glue Gun
- Glue Sticks
- Exacto knife
- Duck Tape (Target $4.99)
- pencil
- ruler
I began by selecting a size to do my board. I used half of the board and sectioned that off as my back. Then with the ruler and pencil I began outlining 1inch sections to make them the dividers that hold the nail polish in place. I cut 5 dividers. Make sure you take your time and be careful since this can be a tricky part of the project. You want to make sure your lines are straight and crisp. Then I cut off two long pieces this is where i needed the second board, because i want them to be the length of my nail rack vertically. You also want two 2 inch bands that will go on the bottom and the top of your nail rack.
 Once you have all the pieces cut out, then make sure they all fit perfectly and you can begin gluing. I make sure my glue gun is hot. I begin by gluing the inside strips first. After that I glue the top then bottom the last part is the sides, since I want to make sure everything fits properly. The gluing process is fairly easy I just move really fast. You want to apply the hot flu to the top and bottom of each row, then hold in place for a few seconds. Then just touch of the glue in any places that is needed and your set.
 Now I made this for my friend so this last step is optional!! She loves zebra so I decided to cover the foam board with zebra duck tape, you can use any design duck tape you want. They have tons of different prints at target. I first cover all my side panels before gluing them. then I did the back once everything was already glued. This is by far the easiest step, and you can customized it to your choice.

Leave a comment